Information Post
July 30, 2011 1 Comment
Windows Mobile, Palm, and life hacking, all mixed into one tasty site.
April 1, 2024 1 Comment
Update:
I just realized that I posted this on April 1st. This is unfortunately not an April Fool’s Day joke, and instead just the current reality of 2024. Sorry.
December 1, 2023 1 Comment
I have spent much too much time on this, Time to document it so that others don’t need to deal with this as well.
Please note: This requires your site the MSA2040 is installed on to have a Static IP, and for you to be comfortable allowing the MSA2040 to send traffic to the internet on port 25. You will also need the ability to edit settings on exchange online.
Configure your Exchange Online Connector to add your static IP that your MSA2040 will be sending from (note, this isn’t your internal device IP, but the IP of your router that the MSA2040 is behind.)
If you’re sending internally don’t update your SPF record, if you’re sending to an MSP or other provider, do.
Now unfortunately, for some really dumb reason, HP never allowed the 2040 or 2050 to send to an address, only an IP address. I’ve found that Exchange Online does allow you to send to an ip address. Just ping your MX record, and then plug that IP address into the MSA
To make sure you don’t lose any alerts, enable the weekly alert emails. No weekly alert email? probably need to fix the settings.
I know it’s dumb, but it worked for me, hopefully this can help you get it figured out too.
February 10, 2023 1 Comment
I can’t believe I cannot find anything on the internet, not even forum posts with the above.
I purchased a 2013 Fiat 500 Sport in January of this year (2023) and it’s got the OEM shift knob, missing the top half of the knob.
Fiat doesn’t use a standard shift knob style where the knob just spins onto a threaded shift lever. Instead there’s a plastic top held to the knob with adhesive, and then a bolt through the rest of the knob to “secure” it to the shift lever.
It’s not awful, but overly complicated. It does allow for manufacturing to be less strict since you can just slap the shift pattern on top and it’ll always be set up correctly every time. No need for fancy threading to be done _just so_ to make it line up.
However, I don’t want to deal with what’s left of the factory knob and want to instead replace it.
So for any Fiat 500 that has the bolt through the top (I assume European market 2007-2017?, US Market 2012-2017? non-Abarth models) the bolt specs are:
M6-1.0 15mm length with a lock washer at the top.
IF you want to replace it with a spin on knob you’ve got a couple choices:
1: run a cutting die that is M12 or M10 down the outside of the shaft, then spin on your knob. Lots of people do this and remove the reverse interlock. You can also do this while leaving the interlock if you only tap down to the detent in the shift lever where the bottom of the factory ball rests (IF I remember I’ll grab pictures of this and add them to the post, but I want to get the bolt info out there so that others can do the next option)
2: Get an M6-1.0 bolt with the head cut off, or piece of threaded rod, and then a thread spacer to the correct size to fit your knob you’ve purchased. (This is what I”m doing)
3: Buy a universal adapter to fit a threaded knob (the company that made mine sells them, but they’re held to the lever with a single grub screw, and I want this to look as factory as possible)
June 30, 2020 2 Comments
My wife has a 2006 Chrysler Town and Country. We got it for fairly cheap with a few electrical issues, most we could live with except the failure of the horn circuitry. This meant that we had to bypass the fuse box and I jumped the horn trigger wire from inside the van to the horn relay trigger pin so that we could press the horn inside the van and actually get a honk. We had other failed parts like bad 12v sockets and some other minor issues, but they were all livable.
Recently the local pick n pull junkyard had a sale and I picked up a new fuse box and some other quality of life parts for our van. It’s at 230,000 miles and has the typical Minnesota rust, but I’m gonna give it a few nice things while we still use it.
I got the old fuse box out easy enough, got the new one installed, started the van and… ABS light on. First stop: check the fuses. ABS system fuse blown, replace with the one from the old box, restart van… still on. Need a way to scan it to see if it’s a code that will clear, or something else, so I go to the trusty bluetooth dongle…
Torque Pro can’t read it, and I wasn’t planning to shell out $90+ for an expensive OBD2 scanner that came with it’s own app along with waiting for the scanner to ship, etc. I’m not afraid to find a DIY solution and have a handheld PC dedicated to scanning my daily (a 2005 Ford Focus) and my spare car (1994 Chevy Corsica). Naturally I had to look into PC programs that emulate a DRB3 (The Chrysler factory diagnostic computer) when I came across an Android App called ChryslerDRBeFree, a demo of the app ChryslerDRBeThree, a DRB3 diagnostics emulator for mobile devices. While it might not do everything the $3000 handheld can do, it can talk to the ABS modules, and it was a whopping $18.99 compared to $90+ for more expensive apps (and since I use Google Rewards on my phone, it only cost $2.25 out of pocket, totally worth it.)
Fired up the DRBeThree app and got the following message:

The top code is the most recent (It shows as Active) and the other codes are from the blown ABS system fuse which cleared as soon as I replaced it.
I took the old fuse box to the bench and started looking at it. Turns out it is both easy to open, and pretty simple. No major logic on the board, just a pair of capacitors. The logic all lives in the IPM stuck on the front of the fuse box itself, which makes it so much easier to work on. To open the box, first remove all the fuses & relays along with the IMA. With the fuse side up, there are 4 locking tabs that can be removed allowing the plastic fuse & relay alignment layer to come off. To remove the other half of the box & expose the circuit board, flip the box over and gently press on the larger pins for the connectors while prying up on the plastic, it should separate easy enough.
Next, I found where the bad side of the ABS wiring went. I was able to figure out which plug it is via a Youtube video which shows it’s the blue plug that has the ABS wiring, along with showing that the ABS fuse gets power on the “lower” pin, but nothing on the upper. I was able to confirm this on mine.
With the fuse box open and using the multimeter in resistance mode, I found that the “Top” pin of the ABS fuse also connects with a pin on the starter relay, and goes straight out the bottom of the fuse box to the wire identified as bad in the Youtube video linked above. (Yellow line in the pictures below)


In the picture below, you can see the corrosion and damage on the factory fuse box with 230,000 miles. The pin with a notch in it is the one connected to the failed wire on the harness. (Bottom left large pin in the square arrangement)

In the youtube video I used to give me a starting point the mechanic was able to source a replacement connector and rebuild the connector so that the wiring is working as designed. Unfortunately I was under a time crunch to get the van back on the road safely (I drive for work often and want it safe when driving in the metro area), so I wanted not only to test my theory, but get the van back on the road. I used a crimp splice just like in the video, but instead of putting a new end on it and putting it into the factory connector, I used the exact same trick I used for the horn, except for the ABS pump wire. Power goes from the top of the box (from the fuse\relay point) down the bottom of the box.
The following pictures are an example I created using some wiring I had on my work desk & the spare fuse box, to provide an idea of what I did. The wiring installed on the van currently is 10 gauge wiring, but ran the exact same way. I hadn’t even tried looking at the wire on the van prior to coming up with this solution, and when I tried to gently pull the “bad” wire from the rest to cut it for the crimp, it fell out of the plug. (bad wire also pictured below and circled)


If you run into a similar issue, hopefully this gives a good starting point for how to diagnose and repair it. It took me a good day to do all the diagnostics, but I’m glad I did. Opening the fuse boxes revealed a bunch of corrosion inside the boxes which IW as able to clean and mitigate, along with learning more about the way the boxes work.
July 11, 2019 Leave a comment
This is mostly just me dumping my notes and keeping track of progress I’m making on this project.
I discovered a Facebook group for the engine in the Corsica (called 60degreev6) which is full of nutters like myself wanting to squeeze more power out of a small v6 and tackle issues that GM never did with their programming.
Turns out the 94-95 v6 cars have a flash-by-wire ecu that is entirely serial programmable. You need a $10 FT232RL based serial flashing module (mine is from adafruit, but most any 5v Arduino programmer that does TTL serial and has a tx, rx, and gnd pin will work. I’ve got a previous post on it for reading data, but to flash, go genuine ft232rl. Knockoffs aren’t worth it (although technically since a replacement ecu is $10 off eBay, if you’re brave go for it. I invested the $10 up front instead of possibly down the road)
My goals in this:
* Remove the annoying check engine light that comes from the EGR being dead beyond repair, and costing $60+ for a replacement. Instead I will leave it on as a physical block off plate, and edit the programming for using the EGR (it’s supposed to be disabled under a certain RPM, so just set it above the maximum rpm for the engine and the ecu never uses it or the mapping for it. Since it’s not my daily, the negligible drop in mpg (supposedly up to 5%) won’t hurt.
2: drop the fan speed temperatures to something reasonable. Factory is something like 225 degrees for low fan, and 230 for high (water boils at 212 atmosphere, and pressurized it boils closer to 230. Properly mixed antifreeze should go to 270, but why even risk it?) I’m planning 210 low (205 off) and 217 high (212 high to low transition)
3: remove 112 mph speed fuel cutout. Speedo goes to 140. Let’s make sure the car can too.
4: research the table for the transmission. It is very timid about the TCC engagement. See if I can make it more aggressive or less likely to throw a code for it.
5: successfully upload it back to the car. It seems straightforward. If I brick it I order another ecu. Easy as
6: (optional) vanity ViN in the ecu. Because why not. Nobody will ever see it.
November 20, 2018 Leave a comment
Roughly a year ago my daily driver, a 1994 Chevy Corsica, developed a massive coolant leak. Being the person I am, and being broke after our first kid was only a few months old, I kept limping it along, throwing a catch pan under the car when I got to work, dumping the reclaimed coolant back into the bottle in the evening, and repeating when I got home. My aunt and uncle decided that I was being ridiculous and threw the keys at title to their old 2005 Jeep Liberty at me. I was warned that it was making a few nasty noises, but at the least it would allow me to keep getting to and from work without as many worries.
A few days into Jeep ownership, I threw the keys and title for my Corsica at my younger brother and said “fix if you want to, sell if you can’t”. And that is how I spent the next year of my life daily driving a 2005 Jeep Liberty sport.
The Jeep Liberty was what Chrysler decided should replace the Jeep Cherokee Classic. In the late 90’s through the early 2000’s, Chrysler sold the Jeep Cherokee Classic alongside the Jeep Grand Cherokee. The Classic looked like… well a classic Cherokee (XJ) while the Grand Cherokee looked a lot more round and comfy, like a Cherokee that got stung by a bee and discovered it was allergic. The Liberty is also famous for being the SUV that rolled over during testing for AutoWeek magazine. They seemed to be the only magazine that could accomplish such a feat, but Chrysler still decided to drop the vehicle half an inch in mid 2002 to try and make people less afraid of rolling over. There’s also a nice sticker attached to my sun visor explaining that it may roll. Good on them.
Mine is a 2005 Sport model. It has the 4×4 option, along with the 3.7L Dodge engine with all the glorious Dodge electrical. Cloth interior, base sound system, steel wheels, base body panels. Every expense that could be spared, was. It feels like an SUV that is screaming “I can do anything you want as long as it’s nothing special”.
I am also lucky enough to have a full owner history on the vehicle, along with repair documentation. My aunt and uncle kept records of every service, every declined repair, every oil change. It’s a whole 12 pages of amazing documents to pour over. Before they owned it, it was owned by Jordan Gatesmith, the lead singer of Minneapolis band Howler. When my uncle bought it, he found drum sticks and some other musical miscellaneous whatnot floating around. We’ve got records from Jordan’s dad too for repairs, like head gaskets, along with a statement that yes, the low oil pressure light comes on at idle, and yes, it’s been looked at, and no, we don’t know how to fix it. That’s neat, since it’s a common issue that really sucks to fix. I just put up with the “ding” which lets me know that I’m successfully idling again.
My aunt and uncle purchased it for their kids to drive to & from school (They had a Volvo S60 previous to that which ended up being wrapped around a tree.) I will not speak ill of my family’s driving abilities, but I will just say that it’s obvious that the front end of this specific 2005 Jeep Liberty found itself quickly pressed into stationary objects a few times. The front bumper is a replacement. The grille was an amazon replacement part, unpainted. The headlight & grille support bracket was broken. Driver’s headlight held in with wood shims & zip ties. (Now it’s held in with a proper support and zip ties since a few of the bolts were missing) The AC cooler is bent, the transmission auxiliary cooler is banana’d, and the radiator is warped so the driver’s side sticks nearly an inch further into the engine bay than the passenger side. The hood has the “Jeep” bit hammered down enough so that the latch can properly engage and keep the hood down.
In short, it’s a rolling work of art.
When I received the vehicle, it had developed some… noises. It sounded like I had a spun bearing and I was driving on borrowed time. Initially the vehicle was only temporary. Drive it till the Corsica is fixed and then mothball it until it could be sold or crushed. Or both. Two days into driving the Jeep and I had found the main noise source: a failed bearing in the water pump. It took about three hours having never successfully replaced a water pump (although I tried my hardest on the Corsica) and discovering that one of the water pump bolts was not factory (So I had to hunt down a socket large enough to pull the 19mm coarse thread bolt from the standard 16mm fine thread hole). Once it was out, the new one went in within minutes and I had the vehicle filled up and running rather quickly. I did all of this while my wife sat and took care of our two month old.
The other major issue, which is still an issue to this day, is the front differential. I’ve not had time to rip into the whole vehicle, but when I last looked at it, I was pretty certain both front CV shafts were worn and noisy, the outdrive bearing on the passenger side had likely failed (Common problem since halfway through the run they switched from using a needle bearing to a derlin bushing because people were complaining of the needle bearing making weird noises) and the front driveshaft may or may not also need a new CV head. As it it now cold out, it will be looked at properly next spring. Maybe. Probably not. The racket that these failed parts creates has caused the vehicle to live up to the name of it’s previous owner’s band and it certainly is a Howler. If you’re doing between 55 and 65mph it’s unbearably noisy. Combine that with the aged plastics rattling along to the vibrations from failed CVs and you have a symphony of depression and despair.
With the vehicle now properly introduced, let’s get into the meat of the review.
Drivability: 7/10
I have never had so much fun driving over curbs, speed bumps, potholes, and through large puddles of water. It is honestly a very fun vehicle to drive if you throw literally every expectation out the window beyond “it will get me to my destination.” The steering wheel responds as you would expect. When you press on the accelerator, it actually accelerates, and the brakes actually stop it. The alignment is pretty darn straight and it seems to be able to do roughly 92mph on flat road. 97 downhill with a tail wind.
Acceleration: Moped/10
It doesn’t accelerate as much as it does try to get you up to speed. Part of this is on a very lazy overdrive. Doesn’t matter what speed you’re going, if overdrive is enabled, you’re going to have lag between mashing your foot to the floor and the increase of speed you’re expecting. Fortunately they include a button to disable overdrive, which makes highway on ramps and city driving bearable. It does feel like you are driving a 2 ton moped though.
Braking: 9/10
I have a faulty ABS sensor that fails if it’s over 60 degrees ambient outside. So it works all winter and fails in summer. Good enough for me. If you smash on that brake pedal anything unrestrained will attempt to give you a bear hug from behind. You’ve been warned. I’ve avoided doing the brakes on it since every time I do my own brakes, the vehicle is gone from my live within 3 months. I really needed this one to last, and they haven’t made any unhappy noises yet.
Appearance: 6/10.
These turds are everywhere. Sports, Limited, Rocky Mountain editions, Renegade Editions, and the two different front clip styles as well (The 02-04 had a very ugly styling, while the 05-07 had a more “jeep” style.) Most of them have a dry rotted spare tire hanging on the tailgate still, or it’s been stolen, or maybe it’s the factory Jeep Liberty canvas cover that is dry rotted and tattered. Most of them have rusted out doors. (like mine). I don’t see many with steel wheels though, which is a bummer since one of mine is damaged. it’s definitely a vehicle that when you see another on the road your first thought is “parts!” (I do the same with my wife’s 06 Town and Country in Magnesium Pearl. Body panels and doors galore there)
Interior: 4/10
Interior is basic, plastic, and cloth. it’s pretty terrible, but functional. The glove compartment falls out if you hit a bump. Came with weather tech floor mats from some other SUV and the back seats fold somewhat flat, so that’s where the 4 comes from.
Space: 3/10
I fit 19 2U servers into my Corsica. I doubt I’d get 5 in this thing. It has the same footprint as my Corsica, while also being an SUV with a snubby front end, so you’d think it’s spacious, but it’s shockingly cramped in there. HOWEVER, you can fit a 55″ TCL Roku 4K HDTV NEW IN BOX in it with the rear glass closed, so it gets a pass since I can’t easily do that in the Corsica. I can fit 14 people in my Corsica. I fit 19 phones, 2 laser printers, 3 computers, a 55″ TV, and a few other bits of work gear into the Jeep. I’d say that’s comparable.
Vehicle Community: 7/10
Everyone should join their car community. For the Corsica that is the great people at beretta.net and the GM FWD fanclub on Facebook. For the Jeep, there’s a million different groups. The Jeep KJ group is supportive and understanding of how terrible this vehicle is. The local Jeep guys appreciate my sense of humor and are always willing to help out. If I have the roof rack on I get the Jeep wave, so that’s about as authentic as it gets. Jeep guys can be dicks though since half of them are “wrangler or die” types, but that goes with most groups.
Overall score: 52/100
It’s an OK vehicle with OK results to questions I didn’t even know I needed to ask. Don’t get one unless it’s free. I have no idea why people would pay over $3000 for them, but that’s what KBB says mine is worth, even with 192K on it.
September 12, 2018 Leave a comment
EDIT: something still isn’t right in this. I’m investigating.
Oof. That title is a mouthful.
Here’s the rundown. pizzaboy192.com is registered via Namecheap. I also use them for hosting. I’m also cheap and it doesn’t need much, so it runs off shared hosting.
Up until about an hour ago, I was also using a free Dynamic DNS provider. I’ve used them for years. Every few weeks I have to click through the nag page to renew my free Dynamic DNS hostname because I’m cheap and don’t want to pay extra.
Then someone on reddit suggested I use Namecheap’s Dynamic DNS tools. Looked into it, looked easy enough.
Except the disclaimer where it says:
Dynamic DNS is a feature that allows you to point a domain to any IP, and the changes are almost immediate. It is available only for the domains pointed to our BasicDNS, PremiumDNS or FreeDNS.
Yeah, I’m on shared hosting, which means I use their webhost DNS. Even talking with their first level support, I got the same response: You can’t do that because your domain is on shared hosting. Bummer.
Then I talked to another support person last week. They got me about 80% of the way there. You can set up a subdomain to use the namecheap freedns. Here’s how:
Smash your desired subdomain into https://www.namecheap.com/domains/freedns/ and check out. it’ll create a sub section under your account’s domain with the Advanced DNS tab that you need for that oh-so-precious DynamicDNS password.
To configure your DynamicDNS updater client, where it typically asks for your domain, put in your subdomain.domain.tld instead of just your domain.tld that you have registered with namecheap, and it should start updating.
BUT WAIT. When I check the DNS records, I don’t have anything. WHY???
There’s an extra two steps you need to do.
1: make sure your subdomain is NOT set up in cpanel
2: contact namecheap support and tell them you want them to change the NS servers for subdomain.domain.tld to the FreeDNS NS servers. it’s under WHM and if you’re using shared hosting you don’t have access to it, but eventually you’ll get a tech who actually understands you and can set that for you. Takes only a few seconds on their part and it should be configured.
Then all you have to do is wait about 30 minutes for the dns to propagate and you should be golden.
June 20, 2018 Leave a comment
HP recently broke their firmware update for the OfficeJet Pro line of printers that are the Xx76 line. I’ve been fighting this printer for a few days now but have successfully gotten it fully updated after a bunch of hoopla and nonsense.
First, HP did their best to scrub a perfectly fine firmware update from the internet. Firmware revision 1604 was released to remove their silly 3rd party ink restrictions. There’s links to that firmware file everywhere, but HP pulled the file itself off their website. Don’t ask me why. They’re probably wanting to brick these printers in order to sell new ones for all I know.
Fortunately there’s at least one known download link for 1604 that works. Hopefully it keeps working. DriverGuide was kind enough to mirror most of the Xx76 line (X476, X576, etc) and they have the firmware! Just browse to your specific model and see if it’s there. The X476DN firmware wont work on an X476DW and vice versa. I’ve got the 1604 firmware for the DN and DW models of X476 and plan to mirror them soon, but for now DriverGuide is your best bet.
Next: You need to do some firmware jiggerpokery in order to step firmwares. You’ll also need an active network connection on the printer, along with a USB cable available.
First we need to prep the printer. Make sure it’s fully booted and then press the Home button, the back button, and then the Home button 3 more times. (It should start loading after 2 presses, but 3 just to be safe).
You should see a manufacturing mode menu. It’s really neat. Tap the Manufacturing Mode choice. You’ll see a blank screen and up\down arrows on the bottom. Scroll using those arrows to land at the “NVM\FIRMS clear” option. Press OK to enter that menu.
Scroll until you see “Clear Firms” and press OK. It will inform you that you need to reboot the printer. Do so by pressing the power button and allowing a graceful shutdown, followed by a normal power on procedure.
Plug in your USB cable, make sure Windows sees your printer, and run the 1604 firmware update tool. It should see and update to 1604 without issues.
Next, if HP E-Print \ Web Services are not enabled, do so. You will need internet access on the printer to do so, and to download the 1819 update.
Once E-Print services are enabled, Press the button to bring up the menu (Top right button, looks like a PDA with a few “wifi” lines on it). Once E-Print loads, press Settings. Then Printer Update, and Check for Update Now. it will download and install 1819 successfully.
Hopefully this works for you and should save a few headaches.
December 12, 2017 Leave a comment
Ironic that I am throwing this together after I no longer drive my Corsica. Might as well toss this together though as a simple document for anyone else who doesn’t know how cheap it is to get all your sensor data from the Corsica. I know it works with the 94/95 years (should work on the 96 year as well) but you may need different ECU files for older years and different engines.
ALDL is the diagnostic system GM used before OBD 2 was developed. The plug is pretty well documented and easy to use. This cable is also well documented. I am just putting some information together for the Beretta and Corsica owners so that they can diagnose sensor and engine issues.
First you need an FT232RL cable or board. Clones may work, but official ones are best. I get mine off eBay, and buy from US sellers only. Price is twice as much as Chinese sellers but the quicker shipping is worth it. If you end up with a clone the official ftdi drivers will NOT work. No data is passed through clones. I will provide a link to drivers that do work with clones. This eBay link is a random one I found with wires included. No idea if it’s a fake or a real one but it looks like some I’ve used so it’s worth a shot.
You will also need some way to splice this cable into your car’s diagnostic port. On my 94 and 95 Corsica this was pin M for data and pin A for ground. You can use wire taps or cut the wires or use a cable end. I have done all of those options at different times. If you tap or splice, make sure your connections are isolated and clean. 
Wiring up is dead simple. On the ft232rl end, tie the TX AND RX pins together. Do this however you want. I use pin headers soldered together but you can do it however. Add a wire to the GND half as well. Run the TX/RX wire to pin M on the ALDL connection connect ground to ground.
Next is to test your cable to see if you have a legit or a fake ftdi chip. A legit one will pass the tuner pro cable test. a fake one will fail it. To fix a fake chip, just install the older drivers and restart.
Gearhead-efi has a great write-up on this cable. (Thread titled “Uber easy diy USB ALDL cable”. )
HERE IS THE LINK TO THE COUNTERFEIT FT232 driver.
HERE ARE THE ECU DEFINITION FILES
Basic TunerPro RT tutorial:
Load ADX file (unzip files first) 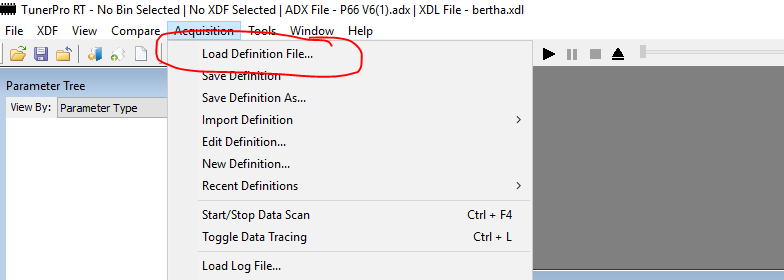

Set up cable (Cable shows up as a COM port. Just pick right one. Press “TEST” button to see if it’s legit or not). 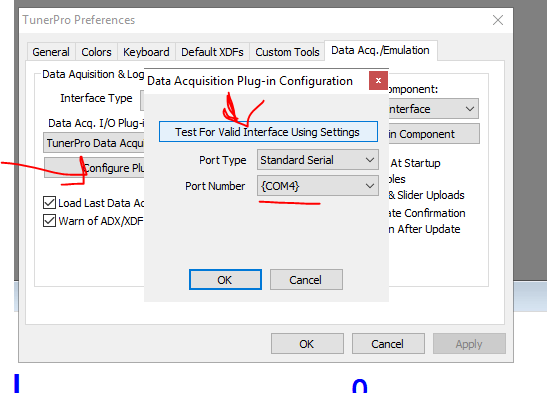
Push the highlighted button to connect to the car’s ECU as long as the car is ON (Does not need to be running but doesn’t hurt).

To load up drivers on a fake FTDI chip, extract the drivers linked. (go to 7-zip.org to extract if you don’t have it installed yet).
Open Device Manager (Windows 10: Right click flag in corner, choose device manager. All Windows: Press Windows button and R on keyboard to open Run dialog, type devmgmt.msc )
Find your FT232RL device (should be under Ports (COM & LPT). Right click your device, choose “update driver”, press “Browse for Drivers” and then “Let me choose” or “Let me Pick” Click Have Disk, and point it to the file in the FT232RL folder you got from the drivers file. It should install and start working.
February 17, 2016 Leave a comment
So a comment on Reddit got me thinking: How hard would it be to make a specialty cartridge for the Classic Gameboy handheld that contains a GSM radio, an antenna, and possibly a battery? Calling would be a secondary function, but the ability to text via Classic Gameboy. That’s a neat idea.
Step 1: Research. How many different ways are there to make cartridges?
Turns out there’s quite a few. One is just a PCB with a flash chip and possibly a memory controller. The other, more feasable method will be the STM32F4 method. Why not stand on the shoulders of giants?
Step 2: How would it work?
With any cartridge, you need a ROM, and since we’re using a GSM module, we’ll need a way to communicate. Option 1: PCB with flash chip and memory controller, you’d have to talk over the link cable socket. The basic method doesn’t support games that have saves or writing back to the chip.
Option 2 is the way we could easily implement this. Dhole seems to have figured out how to make the Gameboy read & write back to an emulated cartridge. This is to our advantage.
I have literally no idea how difficult this would be, but here is the basic concept:
Part 1: Software.
The ROM for the gameboy would require a basic UI to control the modem. Commands like calling, texting, and sending data (if supported by the GSM module) would be written back to the cartridge’s writable memory area (think save file, with the command being the part that is saved). The STM32F4 would then read the memory area every X number of cycles and execute commands to the GSM module. You’d need two sets of programming. One to run the GUI and save commands, and another piggyback program on the cartridge emulator to read the saved data periodically and do whatever it wants.
Part 2: Hardware.
For the hardware, we’d need either an STM32F4 or other compatible piece of hardware. Since the software to emulate a cartridge is already written and the process well documented, why reinvent the wheel. We also need a GSM module. For just texting, a $10 SIM800L Arduino module would work well. If you want to add voice, you’ll need to upgrade to something like the Adafruit Fona module (About $40 right now) or some other GSM Voice module (I’ve found them between $20 and $90 on eBay)
If you want to go completely crazy, you could use something like an Odroid or Raspberry Pi Zero and reinvent the wheel, using the research done and the example code provided.
That’s all I have now. I have no idea how to make this a reality, but it seemed like it would most certainly be possible to accomplish.
